
Last checked: August 2026 · Written by the Badminton House player-led team.
Quick answer: peel gradually and stop when the construction is unclear
Keep an intact factory grip if its feel works for you. Strip it only when you have a clear build or comfort reason, then inspect before rebuilding.
Keep
Choose this: the factory layer is intact, comfortable, and gives you the handle size you want.
Strip
Remove it when you have decided to expose the underlying handle or rebuild the grip from a different base.
Stop
Pause when a fastener, bonded layer, torn material, or connection irregularity is not clear.
You can remove a factory grip safely by taking off the finishing tape, lifting a small edge, and peeling slowly while watching the exposed handle. The construction varies by racket, so this guide ends at inspection and preparation. It does not teach the wrapping direction or final grip sizing.
Ready to rebuild the handle? Continue with our badminton grip guide after the inspection steps below.
Should you keep or remove the factory grip?
Keep the factory grip when it is intact and comfortable. Strip it when you have a specific rebuild reason, such as exposing the handle for a different base feel or removing a worn layer. Neither choice is a universal performance rule because factory construction, hand comfort, and the replacement plan vary by racket.
An overgrip is a separate layer placed over an existing grip. If adding that layer gives you the secure feel and handle size you want, you may not need to expose the handle at all. Do not remove the factory layer simply because another player prefers a thinner build.
| Keep the factory grip when | Strip it when |
|---|---|
| The handle feels comfortable and secure. | You have chosen a clear handle rebuild and understand what you will do next. |
| The layer is intact with no slipping or loose edge. | The old layer is damaged, dirty, or no longer gives the feel you want. |
| You are unsure what lies underneath. | You are prepared to stop if the exposed construction is unclear. |
If your only goal is a slightly different feel, consider whether a suitable overgrip can solve it without removing the original layer. If you do strip it, treat the removal as an inspection job first and a regripping job second.
How do you remove a factory grip without forcing it?
Remove the factory grip with a tool-free initial peel: stabilize the racket, take off the finishing tape, lift a small edge with your fingers, and work gradually around the handle. Stop as soon as the layer does not separate cleanly or the underlying construction needs specialist judgment.
The first two steps in the iFixit badminton grip replacement guide are removing the finishing tape and unravelling the old grip. The cautious sequence below adapts that starting point for model-dependent factory grips.
- Set up the racket. Work at a clear table with the racket supported so the frame and shaft are not being used as a lever. Keep the removed material in one place.
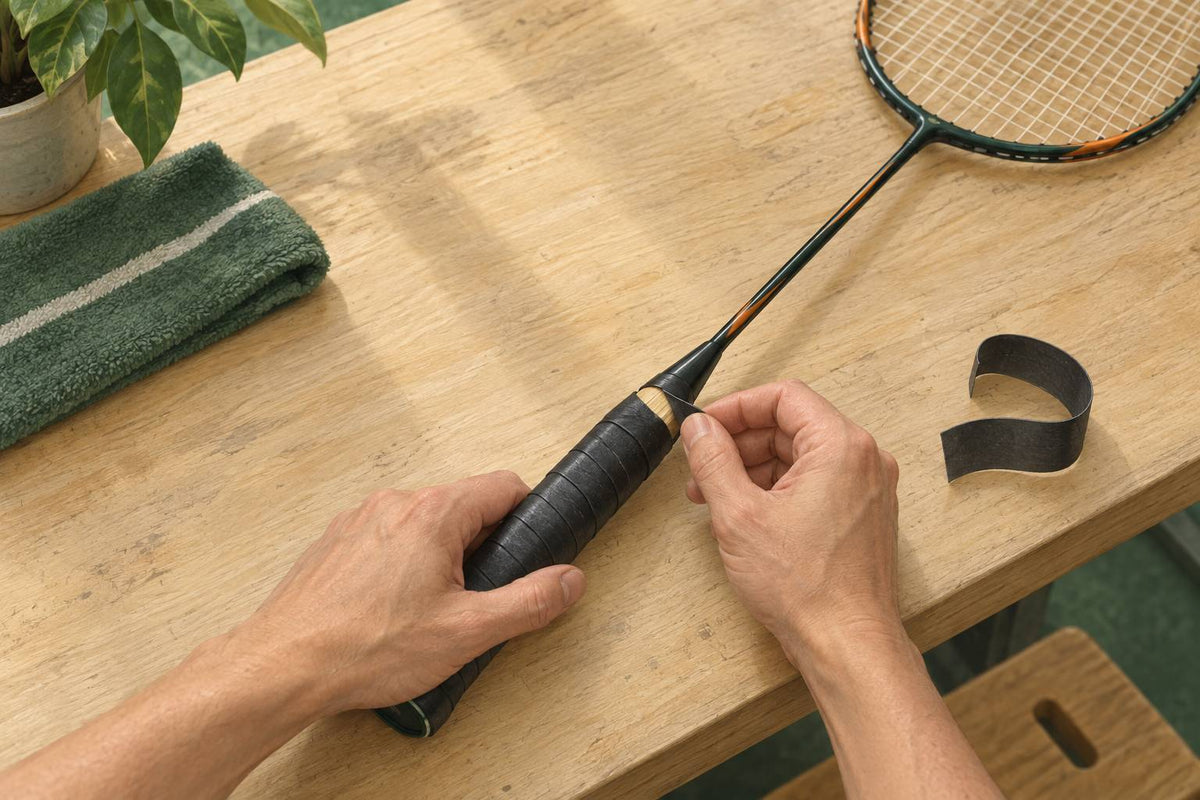
- Find the finishing tape. Start at the top of the grip near the shaft. Remove only the tape that holds the grip end in place.
- Lift a small edge. Use your fingertip to separate a short section. Do not enlarge the opening until you can see which layer is moving.
- Peel gradually. Follow the existing wrap path with light, steady movement. Work a short section at a time and watch the exposed handle.
- Pause at resistance. If the material tears, a fastener appears, or two layers move together unexpectedly, stop and reassess. Do not turn resistance into a force test.
- Finish only when clear. Continue around the handle only while the layer separates predictably. Place the removed grip aside rather than pulling on a remaining bonded section.
A simple stop rule
If you cannot explain what you are peeling, stop peeling. A cautious pause protects the handle better than an improvised attempt to remove an unknown layer.
Do not use cutting, heat, liquids, or abrasion to make a reluctant layer move. The article's removal method is intentionally limited to a gradual peel. Hand the racket to a stringer or service professional when the next step requires a tool or model-specific construction knowledge.
Use these stop-or-continue scenarios
| What you see | Decision |
|---|---|
| The finishing tape lifts and one flexible grip layer unwraps cleanly. | Continue a short section at a time. Keep supporting the handle and watch that only the intended layer moves. |
| The grip tears and leaves small attached patches. | Pause. Do not scrape or dissolve the patches. Decide whether the remaining material is stable enough for professional identification before continuing. |
| A hard point, fastener, or second bonded layer appears. | Stop the tool-free procedure. Photograph the area and ask a stringer or service professional what belongs to this racket model. |
| The layer is off, but the handle or connection looks irregular. | Do not cover the irregularity with a new grip. Complete the inspection below and hand off the racket if the cause is unclear. |
| The layer is off, but you are unsure which replacement build belongs next. | Pause before wrapping. Record the exposed surface and bring the racket, removed material, and your handle-size goal to the stringer. |
These scenarios are decision boundaries, not model-specific construction claims. The safe outcome may be leaving part of the original layer in place until a professional can identify it. Removing every visible trace is not the goal; reaching a stable, understood surface without damaging the racket is. A complete handoff includes what moved easily, where resistance began, and what remains attached.
What should you inspect after removing the grip?
After removal, inspect the exposed handle and the visible racket before rebuilding. Look for cracks, irregularities, loose material, or anything that does not feel sound. Leave uncertain residue or construction alone until you know what it is.
Yonex's racket product-safety guidance tells users to inspect the shaft, frame, and grip for cracks or irregularities. It also describes holding the grip and frame separately and twisting the grip two or three times to check the frame-to-shaft connection. Treat that as an optional gentle check, never a forceful test.
| Check | What to do |
|---|---|
| Shaft and frame | Look for visible cracks, dents, or irregularities before the racket returns to play. |
| Exposed handle | Note which layer is visible and whether it is stable enough for the next planned step. |
| Residue | Treat tape or glue residue as a possibility, not a certainty. Do not aggressively disturb material that is firmly attached. |
| Frame-to-shaft connection | Perform only the gentle optional check. Stop if the connection feels irregular. |
| Fastener or unclear layer | Stop the home procedure and ask a stringer or service professional to identify the construction. |
The GRSA A–Z of Stringing guide says an original base grip is likely to have a staple, but the qualifier matters: it is not a universal construction claim. If you encounter a fastener, do not turn this tool-free guide into a removal procedure for that fastener.
How do you prepare for a new grip after removal?
Prepare for a new grip by making the exposed handle stable, clean enough for the next layer, and free of unresolved damage or construction questions. Decide whether you need an overgrip, replacement grip, or professional rebuild, then use a dedicated grip guide for wrapping and sizing.
Before modifying the racket, check the warranty language for your exact model and region. For example, Yonex USA lists modification or alteration, unauthorised repairs, and excessive heat among exclusions in its US racquet warranty. That does not establish the warranty rule for every country or racket.
Use this handoff checklist
- Record the starting point. Note the racket model and the layer you exposed before adding anything.
- Confirm the inspection. Do not rebuild over a visible crack, loose connection, or unexplained irregularity.
- Choose the next layer. Decide whether your plan calls for an overgrip, replacement grip, or service help.
- Keep the scope clear. This article stops before wrapping direction, overlap, and final sizing.
- Use the related guide. Follow the Badminton House grip guide for the next decision.
Stop or continue?
- Continue when the layer peeled cleanly and the exposed handle looks stable.
- Pause when residue or construction is unclear but no damage is visible.
- Hand it off when you find a fastener, frame-to-shaft irregularity, visible damage, or a step that needs a tool.


Leave a comment
This site is protected by hCaptcha and the hCaptcha Privacy Policy and Terms of Service apply.