Last updated: June 2026 · Written by the team at Badminton House
Quick Answer: Badminton Singles Tactics
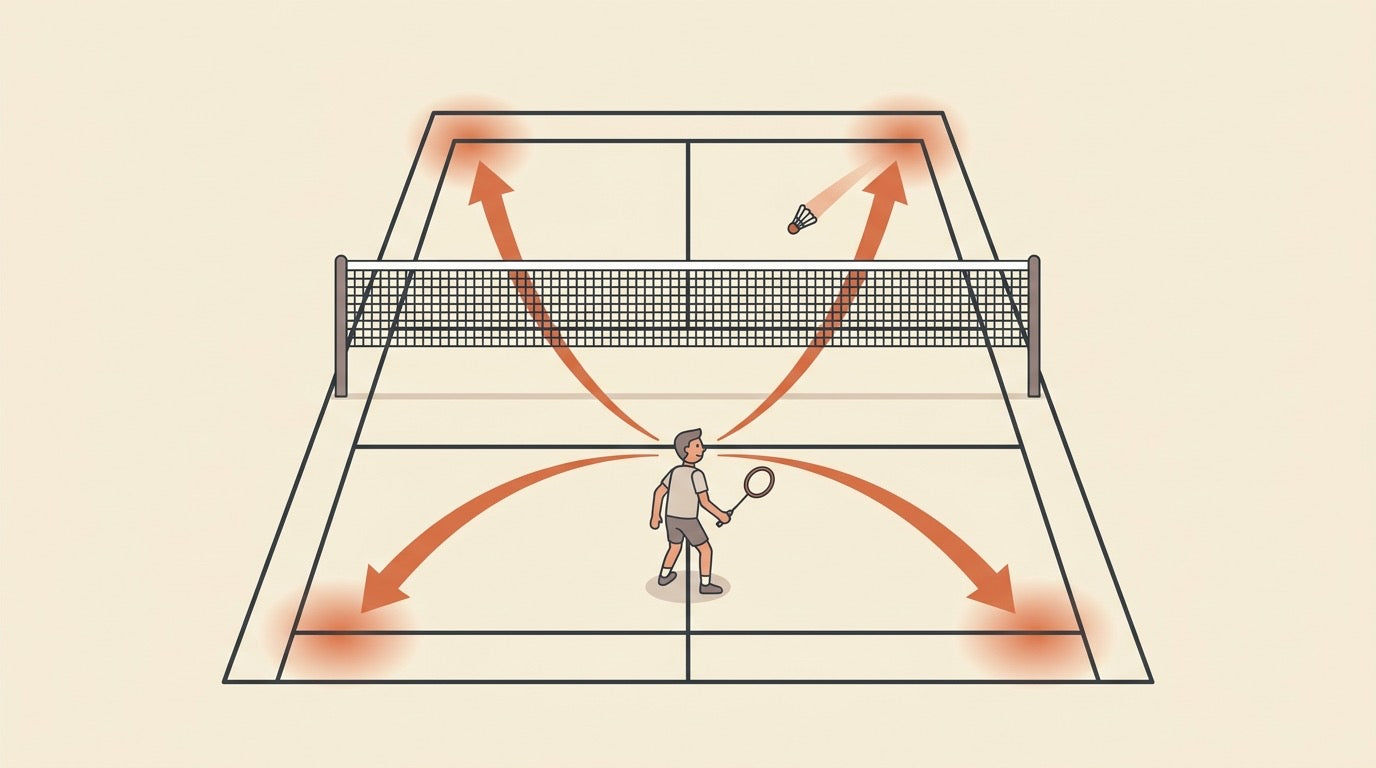
Use four-corner pressure as your default singles plan: move your opponent away from base, attack the space they leave, and reset to the middle when the rally turns against you.
Default
Four corners: use deep clears and drops to stretch the opponent into the rear and front corners, then hit into the open space instead of aiming straight at them.
Pressure
If one corner is weak, especially the rear backhand corner at many levels, repeat that target before switching so the opponent has to stop, reverse, and recover again.
Reset
When you are late, off-balance, or under attack, play a high lift to the middle to reduce the opponent’s angles and give yourself time to recover.
If your singles rallies feel random — clear, drop, scramble, repeat — the missing piece is usually not a new trick shot. It is a plan for where the shuttle should go next. Four-corner control is one of the most useful badminton singles tactics because it turns the court into a movement problem: keep your opponent away from a comfortable base position, make every recovery harder, and wait for the space to open.
The idea is simple, but not mindless. You are not just hitting to all four corners for variety. You are building pressure on a weaker corner, pinning the rear court with deep clears, using drops to pull the opponent forward, and choosing when to switch diagonally, change direction, or reset to the middle. For intermediate Canadian club players, this is the bridge between “getting the shuttle back” and actually constructing points.
This guide focuses on shot placement and rally decisions, not stroke mechanics. If you already have a playable clear, drop, lift, and basic footwork, these patterns will help you use them with purpose.
Building a singles setup? Browse current badminton racket availability in CAD, with free Canadian shipping on orders over $200.
In This Guide
- Why Four-Corner Badminton Singles Tactics Work
- Build Pressure on One Corner Before You Switch
- Pin the Rear Court With Deep and Attacking Clears
- Use Drops to Lure Forward, Then Hit the Space
- Choose the Long Diagonal or the Hard Direction Change
- Know When to Reset to the Middle
- Footwork, Fitness, and Racket Fit for Four-Corner Play
- Which Four-Corner Pattern Should You Choose?
Why Four-Corner Badminton Singles Tactics Work

Four-corner singles is an intermediate rally-construction framework, not a beginner reminder to “hit where they aren’t” and not a stroke-technique lesson. The idea is to use shot placement to pull your opponent away from a strong base position, then choose the next corner based on their recovery, balance, and likely reply.
If you are still building the basics of serving, clearing, lifting, and staying in rallies, start with our badminton singles strategy for beginners first. Four-corner play works best once you can already keep the shuttle deep enough, soft enough, or flat enough to make placement matter.
The goal is recovery pressure. You are not trying to win every rally with one perfect shot. You are trying to make your opponent recover late, recover short, or recover in the wrong direction.
The geometry is simple: corners stretch the court
From the centre of the court, the distance to the middle of the back line is 3.35 m. The distance to a back corner is 4.23 m. That makes the corner about 26% farther than the middle back line. In singles, that extra distance matters because one player must cover the whole court alone.
| Target from centre | Distance | Tactical meaning |
|---|---|---|
| Middle of the back line | 3.35 m | Easier to cover when the opponent recovers well to base. |
| Back corner | 4.23 m | About 26% farther, so the opponent must cover more ground and recover more precisely. |
That does not mean every shot should be smashed into a corner. The better way to think about it is this: the corners increase the cost of every recovery. A deep clear into the rear court, a controlled drop into the forecourt, or a lift that buys you time can all be useful if they make your opponent’s next base position worse.
The real target is the opponent’s base position
Your opponent wants to recover near the centre so they can cover the whole singles court. If they can keep reaching that ideal base position after every shot, they will usually cope with your rallies. Four-corner tactics are designed to challenge that recovery.
In practical terms, you are watching for small signs that the base position is breaking down:
- Late recovery: they are still moving when you contact the shuttle.
- Unbalanced recovery: they reach the shuttle but cannot play a full-quality reply.
- Over-commitment: they lean or step toward one corner before you have chosen your next shot.
- Short recovery: they stay too far forward or too far back, leaving the opposite space open.
This is why four-corner play is more than fitness. Yes, you are making the opponent move. But the bigger purpose is positional: you are trying to make each movement interfere with the next one.
Think in building shots, not instant winners
A good singles rally often develops through building shots. A building shot improves your situation: from defence to neutral, from neutral to pressure, or from pressure to a clear attacking chance. Four-corner tactics give you a simple map for those decisions.
For example, a deep clear to a rear corner may not win the rally. But if it pushes the opponent back and delays their recovery, the next drop can pull them forward. If that drop forces a weak lift or a rushed net reply, you have created the opening. The winner is only the final result; the four-corner pressure is what built it.
For Canadian club and league players, this is also a useful way to choose gear without overthinking it. A racket that helps you place clears, drops, and lifts consistently is often more useful for four-corner singles than chasing maximum smash power only. You can browse our badminton rackets; orders over $200 qualify for free Canadian shipping, and pricing is shown in CAD.
Build Pressure on One Corner Before You Switch
One of the most useful badminton singles tactics is also one of the least obvious: you do not always need to move your opponent to a different corner on the next shot. Sometimes the better play is to hit back to the same corner again, make them stop, reverse, and rebuild their movement from zero, then switch only when their recovery starts to break down.
This works because your opponent is not just chasing the shuttle. After each shot, they are trying to recover toward a central base so they can cover the next one. If you always switch corners automatically, you may actually give them a more natural running pattern. When you repeat the same corner, they must brake their recovery, destroy their momentum, and go back into the corner they just escaped.
"Same-corner pressure is not passive repetition; it is a way to make your opponent reverse momentum before you reveal the open space."
The default target: the rear backhand corner
For most singles players, the standard weaker corner is the rear backhand corner. When forehand technique is competent, players have weaker rearcourt backhands than rearcourt forehands, and at lower levels this weakness often decides rallies by itself. If you can keep asking for a quality backhand clear, backhand drop, or late round-the-head shot, you are making the opponent solve the hardest problem on the court over and over.
The goal is not to win immediately with a spectacular shot. The goal is to build pressure until the next reply is shorter, slower, or less controlled. That is when the four-corner game becomes dangerous: the opponent is still thinking about surviving the weak corner, but the rest of the court is starting to open.
Simple rally pattern
- First shot: play deep to the rear backhand corner and check whether the opponent reaches it comfortably.
- Repeat pressure: if their recovery drifts toward the middle too early, send them back to the same corner.
- Wait for damage: look for a shorter clear, loose drop, late contact, or visible loss of balance.
- Then switch: once the opponent is leaning or late, hit the space they are leaving rather than hitting back at their body.
Why repeating the corner can be harder than switching
If your opponent moves from one corner to another, part of their momentum may still help them. For example, a player recovering forward from the rear court may already have some movement toward the net. But if you send the shuttle back to the same rear corner, they must stop that recovery, turn, and push back in the opposite direction. That braking-and-restarting cost is the point of the tactic.
This is especially useful against opponents who recover automatically to the centre without checking your racket preparation. They may look well-positioned, but if their weight is still travelling away from the corner you are about to target, they are vulnerable. In singles, that small timing error is often enough to turn a neutral rally into an attacking rally.
| Opponent response | What it tells you | Next tactical choice |
|---|---|---|
| They arrive early and clear deep | The corner is not under pressure yet | Keep the rally solid and avoid forcing the switch too soon |
| They contact late or off-balance | The repeated corner is working | Be ready to take the next shuttle early or switch into the open space |
| They start leaning to protect that corner | You have changed their base position | Now the opposite corner or forecourt space becomes more valuable |
| They guess and move before you hit | They are reacting to the pattern, not the shuttle | Use the same preparation and send the shuttle away from their first movement |
Do not repeat blindly
The mistake is to treat same-corner pressure as a rule. It is not. It is a test. You are asking: can this opponent recover, reverse direction, and still play a quality shot from that corner? If the answer is yes, repeating too often becomes predictable. If the answer is no, stay patient and keep building the rally until the court opens naturally.
A good cue is your opponent’s body direction. If they recover with their hips and shoulders already prepared for the next shot, switching may be safer. If they recover with their weight still moving away from the corner, repeating can punish that movement. The shuttle choice should come from what their recovery gives you, not from a pre-planned pattern.
This is where shot quality and footwork connect. To keep pressure on one corner, you need enough balance to play the same stroke preparation again, and you need recovery footwork that lets you cover the reply. If you are late or stretched, choose a building shot instead of trying to force a winner. For the movement base behind this, see Badminton Footwork Basics; for the broader beginner framework, see Badminton Singles Strategy for Beginners in Canada.
Canadian club-night takeaway. In your next singles game, pick one rear corner to test early. If the opponent’s backhand rear corner produces late contact or short replies, keep pressure there before switching to space. If you are upgrading your setup for singles control, start with our badminton racket collection; orders over $200 ship free in Canada.
Pin the Rear Court With Deep and Attacking Clears
Once you have identified the corner you want to pressure, the clear is the shot that keeps your opponent honest. A good clear does more than send the shuttle high or deep: it moves the opponent away from their central base, establishes rearcourt pressure, and makes the front court and opposite rear corner more available on the next shot.
This is where many intermediate singles players lose the four-corner battle. They understand the idea of moving the opponent around, but their clears land short enough that the opponent can stand comfortably, take the shuttle early, and attack. For four-corner badminton singles tactics to work, your clear has to create real distance.
Clear-length check: after your clear, glance at the opponent’s feet. At least one foot should enter the back tramlines. If both feet stay outside the back tramlines, your clear was probably too short to create real rearcourt pressure.
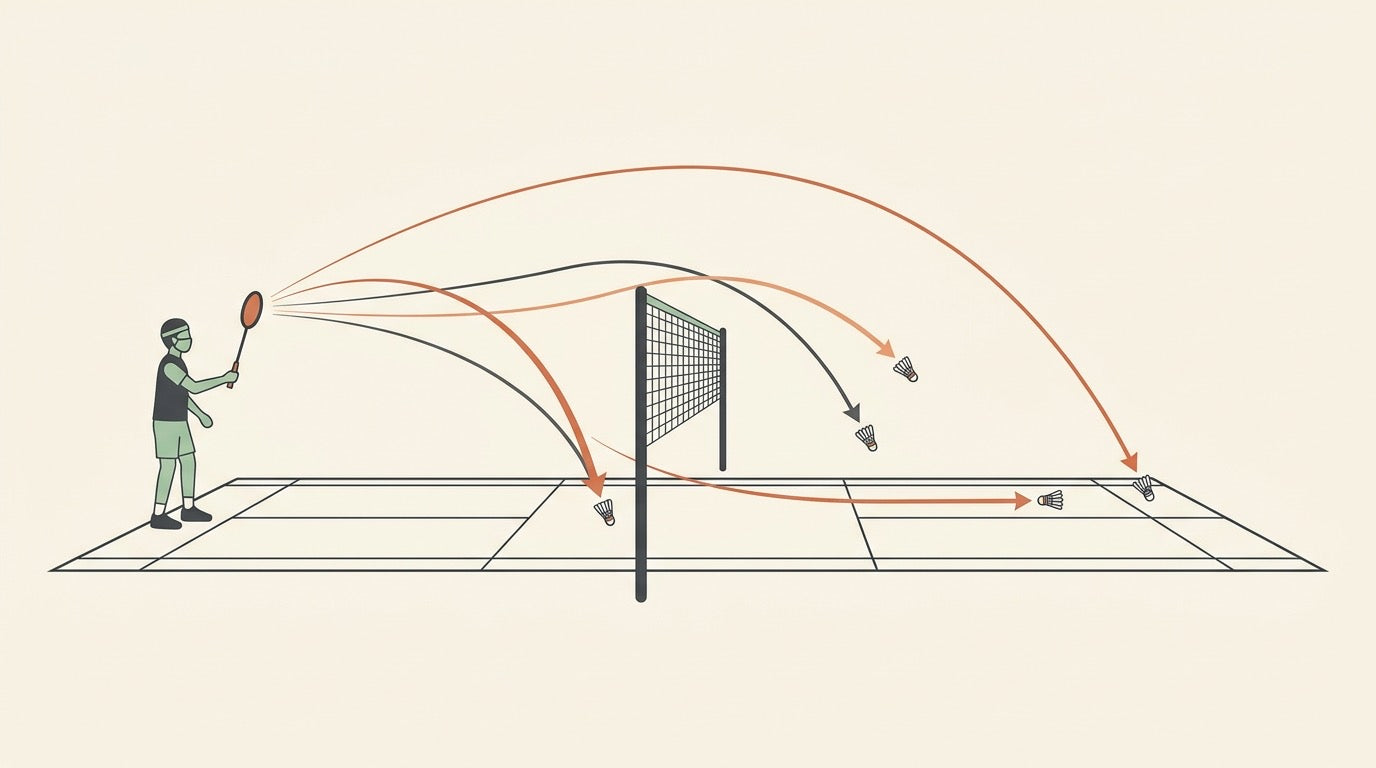
Use two clear shapes, not one
In singles, you need both a defensive clear and a flatter attacking clear. They look similar in the score sheet, but they solve different rally problems.
| Clear type | Trajectory | Best use |
|---|---|---|
| Defensive clear | High and deep | Use it when you need time to recover toward the middle and rebuild the rally. |
| Attacking clear | Flatter and faster | Use it when you are balanced and threatening, especially if your preparation could also become a smash or drop. |
The defensive clear is your rally stabilizer. If you are late, stretched, or under pressure, a high deep clear gives you recovery time and makes the opponent travel back before they can attack again. It is not passive if it lands deep enough; it is a building shot that helps you move the rally from bad to neutral.
The attacking clear, sometimes called a punch clear, is more aggressive. It travels flatter and faster, so the opponent has less time to move behind the shuttle. It works best when you are on balance and your preparation looks like a credible smash or drop. If the opponent believes you can hit down, the flatter clear can slip past their base and pin them deep.
Clear deep first, then attack the space
A deep clear changes the opponent’s recovery problem. Instead of standing near the centre and seeing the whole court, they must travel into the rear court, stop, hit, and recover. That recovery gap is what opens the next shot.
- If they recover slowly forward: play the next shot into the forecourt space they have left.
- If they overprotect the front court: clear again and keep them pinned deep.
- If they lean toward the pressured side: switch to the opposite rear corner or play into the open front diagonal.
- If their reply is short: step in and take the shuttle early rather than drifting back to neutral.
The key is that you are not clearing just to avoid losing the rally. You are using the clear to pull the opponent away from base, then hitting the space they leave behind. That keeps the four-corner plan connected instead of becoming random corner-to-corner hitting.
Keep the earlier pressure pattern, but make the clear quality do the work
The previous section, Build Pressure on One Corner Before You Switch, explains why repeating pressure on one corner can be effective. Here, the adjustment is simple: do not rely only on the idea of the pattern. Make the clear long enough and sharp enough that the opponent actually has to move into the rear court.
For many club players, one extra half-metre of clear length changes the whole rally. A short clear gives the opponent an easy attacking position. A deep clear makes them hit from the back tramlines, delays their recovery, and gives your next drop, net shot, or opposite-corner clear more value.
If your backhand clear is the shot breaking down under pressure, work on the mechanics separately with our badminton backhand clear technique guide. And if your racket feels too slow to recover or too demanding to clear deep late in rallies, start with the Badminton House racket collection; pricing is in CAD, and Canadian orders over $200 qualify for free shipping.
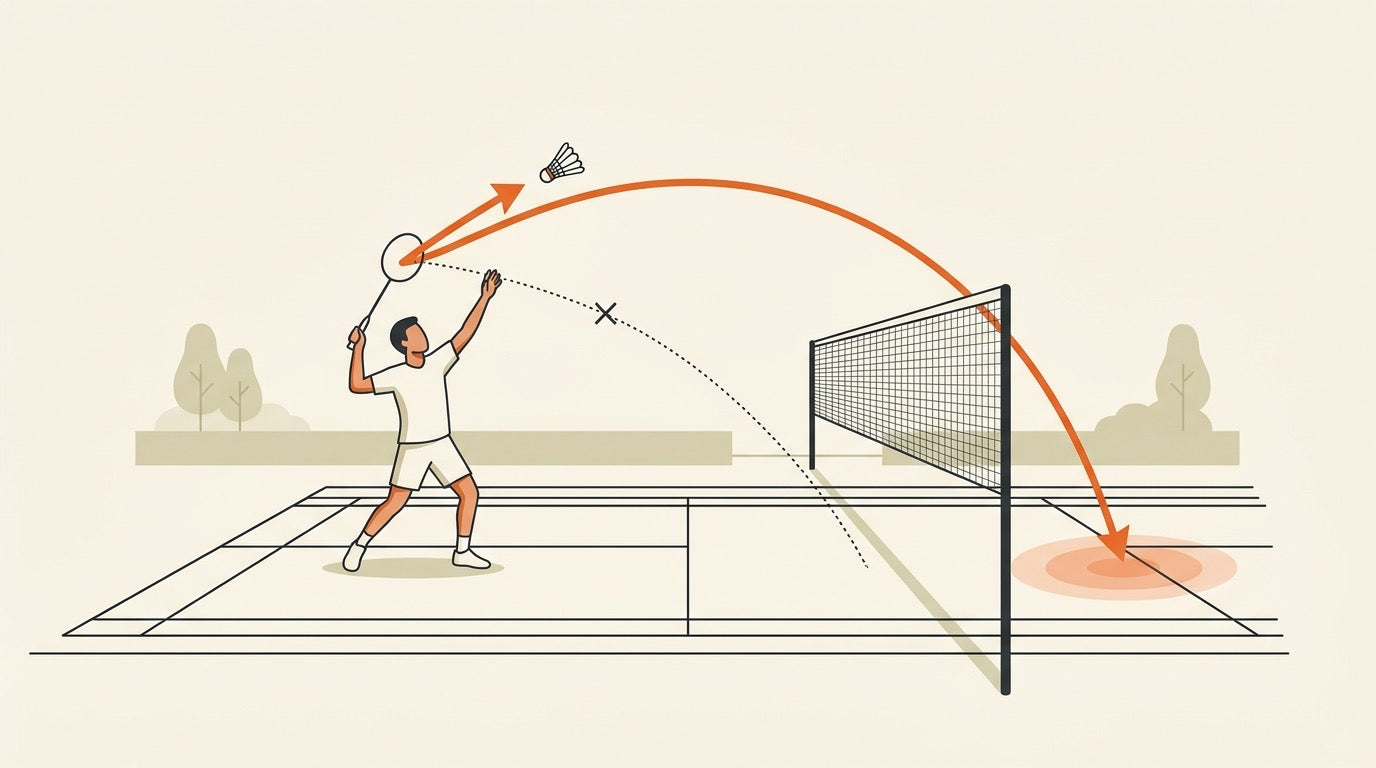
Use Drops to Lure Forward, Then Hit the Space

Once your clears have made the opponent respect the rear court, the drop shot becomes much more dangerous. Not because every drop has to be a winner, but because it asks a tired or slightly late opponent to stop moving back, come forward, and then recover again before you choose the next corner.
The key idea is simple: hit the shuttle to the space your opponent is leaving, not back to where they already are. In singles, a good drop often works best after the opponent has started leaning backward, guarding a deep clear or expecting another rear-court shot.
Drop shots are setup shots. If you need help with the stroke itself, pair this tactical section with our badminton drop shot technique guide.
The deep, deep, then forward pattern
A clean four-corner sequence often looks like this:
| Shot | What it asks from the opponent | What you look for next |
|---|---|---|
| Deep clear or attacking clear | Move back and defend the rear court. | Are they late, off balance, or recovering too far back? |
| Another rear-court threat | Keep respecting the back line instead of rushing forward early. | Do they begin leaning or guessing toward one side? |
| Drop to the front court | Brake, change direction, and come forward. | Can you take the net early, or is the opposite rear corner open? |
| Net shot, lift, push, or next clear | Recover from the front while covering the whole court. | Hit the open space they leave during recovery. |
Notice that the drop comes after you have earned it. If you drop too early, before the opponent is worried about length, many players can simply step in and play a tight net shot. If you have pinned them deep first, the same drop becomes a positional weapon.
Use the drop to create net control, not just a winner
At club level, a lot of Canadian singles rallies are lost because players treat the drop as a soft smash: they expect it to end the point immediately. A better mindset is to use the drop to bring the opponent forward and make their next recovery uncomfortable.
- If they lift short: you may get an attacking chance from mid-court or rear court.
- If they play a loose net shot: you can step in and threaten the net kill or hold-and-push.
- If they recover too far forward: the deep rear court opens again.
- If they over-cover one front corner: the other front corner or long diagonal may be available.
This is why four-corner singles is rally construction, not random variety. You are not just mixing shots to look unpredictable; you are watching what space appears after each recovery.
The drop is strongest when it makes the opponent move forward into a bad recovery, not when it simply lands softly.
Example: slice drop away from the lean
A useful four-corner example is a slice drop to the forehand front court when the opponent is centred but leaning toward the backhand side. The opponent is not necessarily far out of position yet, but their body is already preparing for the wrong direction. The slice adds disguise, and the shuttle goes into the space they are leaving.
That is the tactical difference between a normal drop and a four-corner drop. A normal drop may be aimed at a corner. A four-corner drop is aimed at the corner that punishes the opponent’s current recovery, balance, or expectation.
What to watch before you drop
Before choosing the drop, read three things quickly:
- Depth of their base: if they are recovering too deep, the front court is available.
- Body lean: if they are leaning to protect one rear corner, drop away from that lean.
- Racket preparation: if they are already waiting with the racket high and forward, a drop may feed their net game instead of hurting them.
Also be honest about your own position. If you are late behind the shuttle, a slow drop can become an invitation for your opponent to take the net. From a balanced position, however, the same drop can look like a clear or smash for long enough to pull them the wrong way.
Racket fit for this pattern
For four-corner singles, the right racket is the one that lets you threaten the rear court and still control the shuttle softly at the front. If your frame feels too slow to hold, slice, or recover after a drop, you may struggle to sell the same preparation for multiple shots.
You can browse current options in our badminton racket collection. Badminton House prices in CAD, and Canadian orders over $200 qualify for free shipping, which is helpful if you are building out a full singles setup with strings, grips, or other essentials.
The tactical takeaway: pin deep first, drop when the opponent’s recovery gives you front-court space, then make the next shot based on what they leave open. That is how a drop shot turns from a single stroke into a four-corner singles weapon.
Choose the Long Diagonal or the Hard Direction Change
Once you have pulled your opponent away from base, the next question is not simply “which corner is empty?” It is: do you make them travel farther, or do you make them reverse direction harder? Those are two different ways to create pressure in badminton singles tactics.
| Choice | What it asks from the opponent | When to use it |
|---|---|---|
| Long diagonal | Makes them cover a slightly longer route across the court. | Useful against players who change direction well but do not have great raw speed. |
| Hard direction change | Forces them to stop, brake, and move into a different corner instead of flowing along the same path. | Useful against players who are quick in a straight line but slow to recover their balance after the first shot. |
The long diagonal is the classic “make them run” option. For example, after a deep shot to the rear backhand corner, a tight drop or net shot into the opposite forecourt can make your opponent travel across the longest practical path. If they are agile, balanced, and good at split-stepping, they may still turn smoothly — but if they lack straight-line speed, the extra distance starts to show.
The hard direction change is more about balance than distance. Instead of sending them diagonally away, you make them move, stop, and go somewhere that breaks their recovery rhythm. This matters because singles is not just about reaching the shuttle; it is about reaching it early enough to play a quality reply.
Practical rule: if your opponent is quick but unstable after lunges, test direction changes. If they recover cleanly but look slow over distance, test the long diagonal.
A simple rally pattern to test both options
- Start with depth: play a good-length clear or attacking clear into a rear corner.
- Watch the recovery: does your opponent drift back to base smoothly, or do they overrun the corner?
- Try the long diagonal: if they are late over distance, send the next shot to the far opposite corner.
- Try the direction change: if they are fast but unbalanced, make them brake and move into a different corner.
- Hit the space: do not aim at the player; aim at the court they are leaving open.
This is why four-corner singles should be treated as rally construction, not a highlight-reel winner hunt. Many of these shots are building shots: they improve your position, make the opponent’s next movement harder, and create the weaker lift, loose net shot, or short clear you can finally attack.
If you want more detail on disguising the same preparation before changing direction, see our badminton deception technique guide. If the issue is that you cannot get behind the shuttle early enough to choose either option, work through the movement patterns in Badminton Footwork Basics.
Your racket can also affect how comfortable these changes feel. A frame that is too demanding may make late defensive lifts and quick changes harder; a setup that fits your swing makes it easier to play the shot you actually chose. Canadian players can browse badminton rackets with prices in CAD, and Badminton House offers free Canadian shipping on orders over $200.
Know When to Reset to the Middle
Good badminton singles tactics are not about forcing a winner from every corner. Four-corner play works best when you treat shots as a way to build the rally: bad to neutral, neutral to pressure, pressure to a real chance to finish.
That matters most when the rally turns against you. If you are stretched, late, or recovering from a poor-quality shot, trying to hit an ambitious winner usually gives the opponent the next attack. The smarter goal is often simpler: improve the rally from bad to neutral.
Reset tactic: when you are under pressure, a high lift or defensive clear to the middle can neutralize many opponent advantages and give you time to recover before you restart your four-corner pattern.
Why the Middle Reset Works
Four-corner tactics normally try to pull the opponent away from their base and make recovery harder. But when you are the player out of position, the priorities flip. Instead of creating maximum movement for them, you need a shot that limits their next advantage and helps you recover toward a usable base.
A high, safe shot through the middle is not a “give-up” shot. It is a defensive-building shot. It buys time, reduces the immediate damage from the opponent’s attacking position, and lets you get your feet back under you before choosing the next corner again.
| Rally situation | Risky response | Better reset |
|---|---|---|
| You are late in a rear corner | Forcing a flat attacking clear or tight drop while off balance | Play a high defensive clear or lift through the middle to buy recovery time |
| You have been dragged forward and wide | Trying a low-percentage cross-court winner | Lift high to the middle, recover, then rebuild the rally |
| Your opponent is waiting for your obvious corner switch | Switching anyway because the pattern says “move them” | Reset to neutral first, then look for the next open space |
| Your legs are no longer underneath you | Continuing to attack from a weak base | Choose height, length, and recovery before restarting pressure |
Do Not Confuse Resetting With Playing Passively
A reset is only useful if it helps you recover and prepare the next shot. After the high middle lift, get back toward your base, split step, and be ready to defend or counter into space. If the opponent gives you a weaker reply, you can go back to the normal four-corner plan: deep clear, drop, long diagonal, or hard direction change.
This is where many intermediate players lose rallies. They understand that corners create pressure, but they keep aiming for corners even when their own position is already broken. The better player knows when to stop stretching the rally and first repair their position.
- Attack the corners when you are balanced. That is when your clear, drop, or diagonal change has enough quality to challenge recovery.
- Reset through the middle when you are scrambling. The goal is not to win that shot; it is to stop the rally from getting worse.
- Restart the pattern only after recovery. Once you are neutral again, go back to hitting the space your opponent is leaving.
If your reset shots keep falling short, review your overhead base with the backhand clear guide, your movement with badminton footwork basics, and your stamina with the badminton fitness training guide. For racket fit, start with the badminton racket collection; Badminton House lists prices in CAD and offers free Canadian shipping on orders over $200.
Footwork, Fitness, and Racket Fit for Four-Corner Play
Four-corner singles is not just a shot-selection idea. It is a physical agreement with yourself: if you choose to move your opponent corner to corner, you also need the footwork and fitness to recover well enough for the next shot.
In intense singles rallies, players often cover 6–7 metres in multiple directions. That is why the tactic breaks down quickly when your movement is inefficient. Every late split step, extra recovery step, or off-balance lunge costs energy and usually lowers the quality of the next clear, drop, or lift.
Movement checklist for four-corner singles
- Split before the opponent hits: the split step is the first step of any movement because it lets you change direction quickly.
- Recover with purpose: do not drift back to the middle automatically; recover to a base that matches the shot you just played and the reply you expect.
- Arrive early, not just fast: good footwork helps you reach the shuttle earlier, which gives you better options and cleaner shot quality.
- Save energy on easy movements: efficient steps matter because singles rallies can demand repeated coverage in every direction.
If your footwork is the limiting factor, spend time on the basics before adding more complex patterns. Our badminton footwork basics guide covers the core movements that help you get in and out of the four corners with fewer wasted steps.
Fitness matters too. Four-corner control works best when you can keep choosing the right shot late in the rally, not just in the first three exchanges. For the endurance side, use the badminton stamina and fitness guide to build the engine behind your singles tactics.
Racket fit note. For four-corner play, choose a racket you can still move cleanly when tired. Browse badminton rackets and check current availability before assuming a specific all-round or control model is in stock. Badminton House lists prices in CAD and offers free Canadian shipping on orders over $200.
The simple test is rally quality. If your racket feels late in the hand after a few hard corners, your clears will shorten, your drops will sit up, and your recovery will suffer. The right fit should support the tactic: enough stability to hit deep, enough maneuverability to defend the next corner, and enough comfort that you can keep making good decisions under pressure.
Which Four-Corner Pattern Should You Choose?
Four-corner singles is not just “hit to any corner.” Choose the pattern that best matches what your opponent is giving you: a weak rear corner, slow recovery, poor turning ability, or a moment where you need to reset the rally.
| If you notice... | Choose this pattern | Why it works | Best supporting skill |
|---|---|---|---|
| Their rear backhand is weak or rushed | Pressure the backhand rear corner first | The rear backhand is a standard singles target, especially at lower levels. Pin them deep with full-length clears, then switch once their recovery slips. | Clear quality and backhand pressure. For technique support, see the backhand clear guide. |
| They recover well when you keep switching corners | Repeat the same corner before changing | Repeating one corner can force a harder momentum reversal than constantly alternating corners. The switch becomes more dangerous after you have made them stop and restart. | Patience and disguise. Pair this with the ideas in badminton deception technique. |
| They are agile but do not cover distance quickly | Use the long diagonal | Make them cover the longer corner route and hit into the space they are leaving, rather than straight back at their body. | Shot selection under fatigue. Build the engine for this with badminton stamina training. |
| They move fast in straight lines but struggle to turn | Force the hard direction change | A different corner can punish poor balance and recovery timing. Test this against the long diagonal because the better option changes by opponent. | Efficient split step and recovery. Use the badminton footwork basics guide to sharpen the movement side. |
| They are leaning backward or expecting another rear-court shot | Drop into the open front court | Drops lure the opponent forward after rear-court pressure. A disguised drop is especially useful when their base has shifted or their weight is leaning the wrong way. | Drop-shot control. For execution, use the badminton drop shot guide. |
| You are late, off balance, or losing the rally | Reset to the middle with height | A high lift to the middle can neutralize the opponent’s advantage and buy time to recover instead of forcing a risky winner from a bad position. | Rally management. If you are still building your singles base, start with badminton singles strategy for beginners. |
Use this table as a match-day checklist: the earlier sections on pinning the rear court, using drops, choosing diagonals, and resetting to the middle explain the patterns in more detail, but your in-rally choice should stay simple.
Gear note for Canadian singles players. Four-corner tactics reward recovery, shot quality, and control under movement, so do not choose a racket on smash power alone. Browse our badminton racket collection for current options; the Yonex Astrox 100 ZZ at $299.99 CAD and Yonex Astrox 100VA Game at $349.99 CAD are head-heavy attacking models and are currently sold out. Badminton House offers free Canadian shipping on orders over $200.
Get Canadian badminton gear advice + restock alerts
Join the Badminton House list for buying checklists, restock alerts, and practical gear advice for Canadian players.
By subscribing, you agree to receive Badminton House emails and can unsubscribe anytime.
Four-corner singles is not about hitting harder for the sake of it; it is about choosing the right space, making your opponent recover under pressure, and knowing when to reset. We play badminton too, so if you are unsure whether your racket, string setup, or training focus fits this kind of singles game, contact us and we will help you think it through.
Build a racket setup that supports your singles tactics
Browse our badminton racket collection, then reach out if you want help matching weight, balance, and feel to your four-corner game.
Shop Badminton RacketsCanadian badminton specialty shop · Gear advice from players who understand the game
Leave a comment
This site is protected by hCaptcha and the hCaptcha Privacy Policy and Terms of Service apply.