Last updated: June 2026 · Written by the team at Badminton House
Quick Answer: Badminton Jump Smash
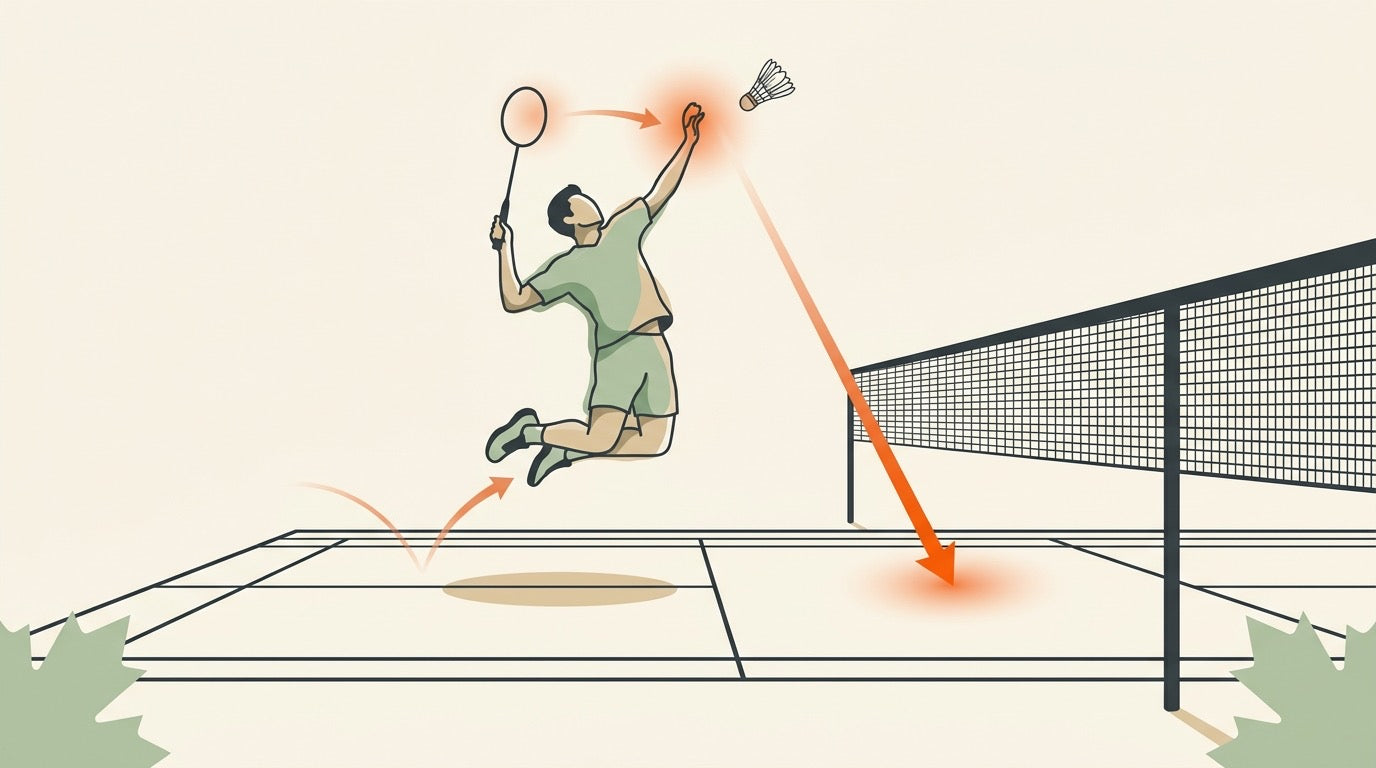
Use the badminton jump smash to create a steeper downward angle: get behind the shuttle, contact it high and slightly in front near the peak of your jump, then land balanced for the next shot.
Default
Best choice: jump for angle, not just height; the shot works when your footwork, body coil, forearm pronation, and balanced landing happen as one repeatable sequence.
Power
If your smash feels weak, do not just jump harder; transfer power from legs through the torso and shoulder, then finish with fast forearm pronation through contact.
Beginner
If you cannot hit a consistent standing smash yet, build that first; the jump smash is harder to time and can leave you exposed if your recovery is late.
The badminton jump smash looks like one big explosive moment, but most missed jump smashes come from the steps before contact: arriving late, jumping under the shuttle, tightening the arm, or landing so off-balance that the next block wins the rally.
The goal is not simply to jump as high as possible. The jump is useful because it lets you contact the shuttle higher and slightly in front of your body, creating a steeper downward angle while your legs, trunk, shoulder, arm, and forearm work together through the shot. That angle is what makes the smash dangerous: the steeper the shuttle travels while still clearing the net, the harder it is for your opponent to lift or counter cleanly.
If your regular overhead smash is not reliable yet, build that first. A jump smash asks for timing, body control, and recovery all at once. This guide breaks it into a repeatable sequence Canadian club players can practise safely: get behind the shuttle, coil and load, time the takeoff, pronate through contact, then land ready for the next shot.
Practising jump smashes? Start with court-safe support. Proper badminton shoes help you grip, land, and recover on indoor courts. Browse our Canadian badminton footwear collection — prices are in CAD, with free shipping in Canada on orders over $200.
In This Guide
- Why the Jump Smash Is About Angle, Not Just Height
- Badminton Jump Smash Setup: Get Behind the Shuttle
- Coil, Load, and Stay Relaxed Before Takeoff
- Time the Jump So Contact Happens at the Peak
- Pronate Through Contact for Racket-Head Speed
- Land in Balance and Recover for the Next Shot
- Gear That Supports Jump Smash Practice
- Which Smash Should You Choose?
Why the Jump Smash Is About Angle, Not Just Height

A badminton jump smash is a forehand overhead hit while you are in the air. The goal is not simply to jump high for style points — it is to contact the shuttle from a position that lets you send it down at a steeper angle than a normal smash.
That angle is what makes the shot dangerous. A steep smash is harder to return because the defender has less time and a more awkward upward path to control the shuttle back over the net. The jump adds threat when it improves your contact point and lets the shuttle travel down into the court, not when it turns into a disconnected vertical leap.
Think angle first. If your regular smash is still flat or inconsistent, build that foundation before adding the jump. Start with our badminton smash technique guide, then layer the jump on top.
Height only helps when it improves the contact angle
Jumping higher can help because it can raise your contact point and make your smash look more threatening. But height only matters if you still strike the shuttle high and slightly in front of your body. If the shuttle is too far behind you, the jump will not create the steep downward line you are looking for.
For Canadian club players, this is the practical test: after you jump, does the shuttle travel down into open court, or does it fly flat toward the defender? A lower, well-timed jump with clean contact is more useful than a bigger jump that makes you late, tense, or off balance.
- Good jump smash: contact is high, slightly in front, and the shuttle drives steeply downward.
- Poor jump smash: the jump is high, but contact is late or flat, so the defender gets an easier return.
- Main idea: use the jump to create a better hitting angle, not to replace sound overhead technique.
Badminton Jump Smash Setup: Get Behind the Shuttle
The first step in a repeatable badminton jump smash is not the jump. It is the setup: move early, get behind the shuttle, and arrive balanced enough that your body can rotate through the shot instead of reaching backward in the air.
Think of the setup as a checklist before takeoff. If one part is missing, the jump smash becomes a rushed overhead hit rather than a controlled attacking shot.
- Move quickly first: start your footwork as soon as you read the lift or clear. The jump smash depends on arriving early enough to load your body, not just reacting at the last second.
- Get behind the shuttle: position yourself so the shuttle will be slightly in front of you at contact. If the shuttle is already behind your hitting shoulder, the downward angle disappears and the shot becomes much harder to control.
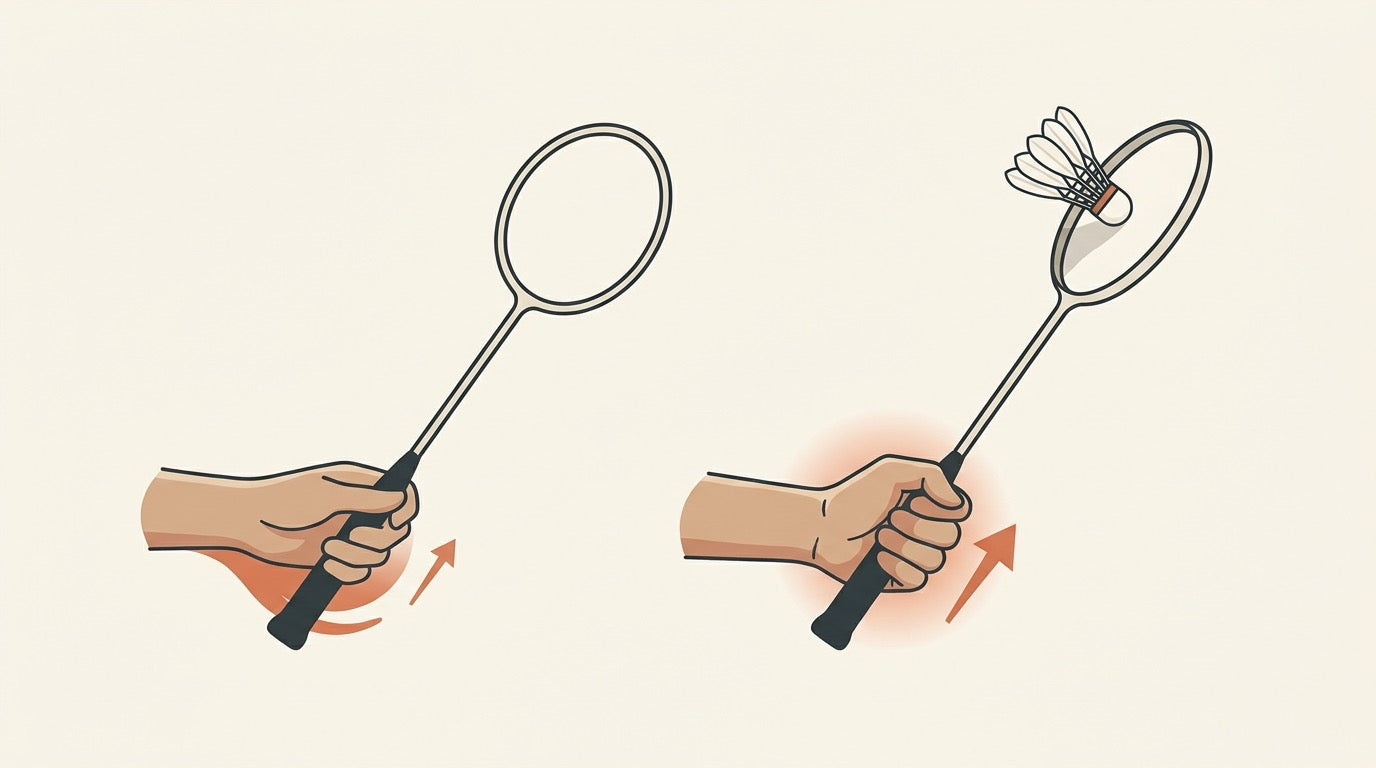
- Use a forehand grip: set the grip before the jump so your arm can swing freely through the overhead motion. Changing grip late usually makes the whole stroke feel tight and rushed.
- Stay balanced: arrive firmly, with enough control that you can coil, jump, strike, and land without drifting out of the rally.
- Turn sideways: set your body side-on, with both feet pointing toward the side of the court. This gives your hips, chest, shoulder, and arm room to rotate through the smash.
Footwork first, jump second. If you are still learning the movement pattern, build the base with Badminton Footwork Basics before making the jump smash a regular part of your training.
The jump smash is usually performed from the rear court, because that is where you often receive a lift or clear high enough to attack. But there is an important caveat: the farther back you are, the less effective the jump smash becomes. From very deep in the rear court, the shuttle has farther to travel, the angle is flatter, and you leave more open court for your opponent to exploit if they block or drive the smash back.
A useful rule for practice is simple: only jump when you have earned the position. If you are late, off-balance, or still moving backward, prioritize getting the shuttle back under control. If you are early, behind the shuttle, side-on, relaxed, and balanced, then you have the platform for the next parts of the sequence: coil, load, time the jump, and strike at a steep angle.
Coil, Load, and Stay Relaxed Before Takeoff
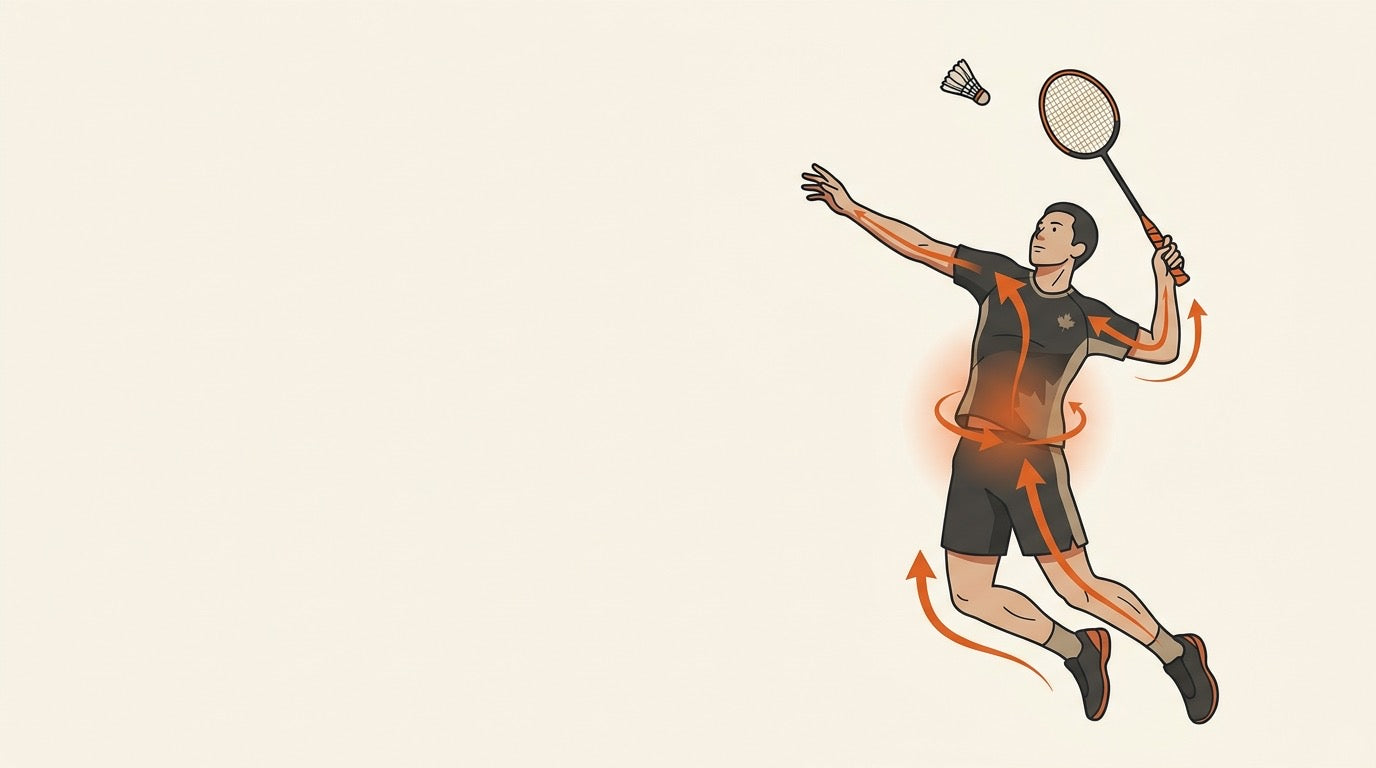
Once you are behind the shuttle, the badminton jump smash should feel like a loaded spring, not a wrist flick with a jump attached. The power starts in the legs, transfers through the hips, abdominals, chest, shoulder, arm, and finally into the racket. If any link in that chain is missing, the smash usually becomes flat, late, or inconsistent.
Think of the loading phase as a sideways, coiled position. Your body is turned, your hitting shoulder is drawn back, and your non-racket arm helps you stay balanced and lined up under the shuttle. You are preparing the whole body to uncoil upward and forward, instead of trying to create all the speed at the very end with the hand.
Key cue: load through the legs and torso first, then let the shoulder, arm, and forearm acceleration finish the shot. For a deeper breakdown of the final forearm action, see our badminton forearm pronation guide.
A common mistake is tensing up during the jump. When your body gets stiff, muscle mobility is restricted, which makes it harder to rotate, reach, and accelerate smoothly. Stay relaxed in the shoulders and grip until the hitting action begins; the smash should build from loose preparation into a sharp, fast contact.
- Legs: bend and load so the jump comes from the floor, not from a rushed upper-body swing.
- Hips and trunk: coil sideways, then rotate through the shot to transfer energy upward.
- Chest and shoulder: open through the hitting motion without forcing a stiff, locked shoulder.
- Arm and racket: let the elbow extension and forearm rotation accelerate the racket head into the shuttle.
Relying only on wrist action is the shortcut that holds many players back. The wrist can add speed at the end of the sequence, but it cannot create reliable jump-smash power by itself. When the legs and torso do not support the shot, the result is usually a weak smash one rally, an over-hit smash the next, and a sore arm after practice.
If you are still learning the regular overhead smash, keep the jump small and focus on the sequence: load, stay loose, uncoil, then strike. For Canadian players building the strength and coordination behind this movement, our badminton explosive power training guide pairs well with this technical work.
Time the Jump So Contact Happens at the Peak
The timing goal in a badminton jump smash is simple to say and hard to repeat: start your hitting action as you reach the peak of the jump, then meet the shuttle at the highest practical contact point, slightly in front of your body.
Do not think of the peak as one frozen frame. In real play, it is a tiny timing window. Some players feel the swing begin right at the top; others feel the hit as they just start to fall from the top of the jump. Both ideas point to the same outcome: the racket reaches the shuttle while your body is fully extended and your contact point is still high enough to create a steep downward angle.
Peak-contact checkpoint
- If you contact too early: you may still be rising, so the swing feels rushed and the shuttle can fly flatter than intended.
- If you contact too late: you are already dropping, so the contact point lowers and the smash loses angle.
- If the shuttle is behind you: you are forced to reach back, which makes a clean, steep smash much harder.
- If the shuttle is slightly in front: you can extend through the shot and send the shuttle down rather than simply forward.
For practice, use a clear verbal cue: “jump, reach, hit in front.” The word “reach” matters because your best jump smash contact is not beside your ear or behind your head. It is high, extended, and just forward of your hitting shoulder.
At elite level, jump-smash consistency is strongly tied to timing and to how efficiently the stringbed meets the shuttle. In other words, the goal is not just swinging harder in the air. It is arriving on time so the racket face, shuttle, and body rotation all line up at impact.
"Treat the peak of the jump as a small contact window, not a pose you hold in the air."
A good drill is to practise without trying to win the rally: have a partner lift shuttles to the rear court, jump only as high as you can control, and judge the shot by contact quality rather than noise. If the shuttle leaves the strings cleanly, travels down steeply, and you can land balanced, the timing is improving.
If your timing breaks down under speed, return to a normal overhead smash first, then build the jump back in. The regular smash gives you the same core contact idea without the extra demand of takeoff and landing. For a broader progression, see our badminton smash technique guide.
Pronate Through Contact for Racket-Head Speed

Once you are in the air and the shuttle is slightly in front of you, the power does not come from “snapping the wrist” by itself. The last burst of speed comes from forearm pronation: a rapid inward rotation of the forearm through contact, similar to turning a doorknob.
Think of the jump smash as a chain, not a single arm swing. The legs start the movement, the hips and trunk rotate, the chest and shoulder open, the elbow extends, and then the forearm pronates so the racket head accelerates through the shuttle. When that sequence is timed well, the racket head arrives fast and the shuttle leaves on a steeper, more aggressive line.
Need the deeper mechanics? Read our full guide to badminton forearm pronation for smash power if you want to understand exactly how the forearm rotation fits into the overhead stroke.
What pronation should feel like
At contact, your grip should stay relaxed enough that the racket can accelerate, then tighten naturally as you hit. The motion is not a big sideways sweep across your body. It is a fast rotation through the shuttle, with the racket face driving down and forward from a high contact point.
- Contact high: strike as high as you can control, with the shuttle slightly in front of your hitting shoulder.
- Rotate through the shuttle: let the forearm turn inward so the racket head whips through contact.
- Avoid wrist-only hitting: the wrist can add speed at the end, but it cannot replace the legs, trunk, shoulder, and forearm sequence.
- Keep the follow-through controlled: a huge follow-through can pull you off balance and slow your recovery for the next shot.
A simple practice cue
Before adding the full jump, practise a standing overhead smash and say to yourself: load, reach, rotate. Load the body, reach high in front, then rotate the forearm through the shuttle. Once that timing feels clean, add a small jump and keep the same contact action.
For Canadian club players training on busy drop-in nights, this is a useful way to build the shot safely: master the pronation and clean contact first, then increase the jump height only when you can still land balanced and recover.
Land in Balance and Recover for the Next Shot

A good badminton jump smash does not finish when the shuttle leaves your strings. It finishes when you land under control and can move again. Aim to land with both feet at the same time, knees bent, so the impact is absorbed and you are ready to push off toward the next shot.
Think of the landing as a soft reset: feet under your body, chest stable, racket returning quickly to a ready position. If you land tall or on one leg, your next movement is delayed. If your knees are locked, the landing feels heavier and makes it harder to spring forward for a block, lift, or net follow-up.
- Land quietly: a loud, stiff landing usually means you are not bending enough through the knees.
- Keep the follow-through compact: an oversized follow-through can pull your body into over-rotation, reduce smash control, and make recovery slower.
- Recover forward when possible: after a steep smash, be ready for a soft block or defensive lift instead of admiring the shot.
- Protect the landing: cushioned indoor court shoes help with repeated jump-smash impact; you can compare badminton-specific options in our badminton footwear collection.
If you are practising jump smashes regularly, do not treat recovery as an afterthought. The player who lands balanced gets the next touch; the player who over-rotates often gives away the advantage they just created. For more on court-shoe choice and landing support, see our guides to badminton shoes vs running shoes and badminton ankle sprain prevention.
Gear That Supports Jump Smash Practice
A cleaner badminton jump smash comes from timing, contact point, and recovery first. Gear will not replace the sequence, but the right racket and shoes can make practice more comfortable and better matched to the shot you are training.
| Gear area | Why it matters for jump smashes | Practical note |
|---|---|---|
| Head-heavy attacking racket | A head-heavy balance can help players who want more weight behind overhead power, especially once their timing and pronation are consistent. | The Yonex Astrox 100 ZZ and Yonex Astrox 100VA Game are relevant examples, but both were recently listed as sold out. Check the live badminton rackets collection before planning around a specific model. |
| Cushioned court shoes | Jump-smash practice includes repeated takeoffs, split steps, and landings, so a proper non-marking badminton shoe is more useful than a running shoe built mainly for straight-line movement. | The Babolat Shadow Tour Men’s Badminton Shoes were the in-stock cushioned court shoe option at $119.99 CAD. Prices on Badminton House are in CAD; free shipping within Canada applies on orders over $200 where applicable. |
If you are choosing a racket mainly for smash power, start with the bigger picture: balance, weight, shaft feel, and your ability to recover after the hit. Our best badminton racket for smash guide is the next stop if you want attacking-racket options, while the head-heavy vs head-light racket balance guide explains why a powerful-feeling racket can also feel slower in defence.
Practice note: upgrade gear after your mechanics are repeatable. A head-heavy racket can reward good timing, but shoes are often the first priority if your jump-smash sessions involve a lot of landing, recovery, and multi-shuttle work.
Which Smash Should You Choose?
The best choice is not always the biggest jump. Use the jump smash only when your setup, timing, contact point, and landing are all ready; otherwise, build the same overhead mechanics with a simpler smash first.
| Choose this | Choose it if... | Why it fits | Do not force it when... |
|---|---|---|---|
| Regular overhead smash | You are still learning the smash or your contact point is inconsistent. | The jump smash is not an easy stroke to master, and beginners should first focus on playing the simple smash well. | You are using mostly wrist action without body support. Build the kinetic chain first with help from our smash technique guide. |
| Controlled jump-smash drill | You can get behind the shuttle, stay relaxed, and swing without tensing your body. | This lets you practise the sequence: move, coil, jump, contact high and slightly in front, then recover. | You are late to the shuttle. Fix the setup first with stronger movement patterns from our badminton footwork basics. |
| Full badminton jump smash | You are in position at the rear court, can contact near the peak, and can land with both feet and bent knees. | The jump gives a steeper downward angle, while the power comes from the legs, trunk, shoulder, arm, and forearm pronation. | You are too far back. The farther back you are, the less effective the jump smash becomes, and the more court you leave open. |
| Skip the jump and recover | You are off balance, over-rotating, or cannot land ready for the next shot. | A big follow-through can make you lose control and worsen recovery, so balance matters more than one dramatic swing. | Your racket-head speed depends only on wrist snap. For the power sequence, review forearm pronation for smash power. |
For landing support, see Gear That Supports Jump Smash Practice. If you are checking footwear now, the Babolat Shadow Tour Men’s Badminton Shoes are the relevant in-stock cushioned court-shoe option in the Badminton House footwear collection.
Get Canadian badminton gear advice + restock alerts
Join the Badminton House list for buying checklists, restock alerts, and practical gear advice for Canadian players.
By subscribing, you agree to receive Badminton House emails and can unsubscribe anytime.
A better badminton jump smash comes from repeatable timing, relaxed power, and a safe landing you can recover from. We play badminton ourselves, so if you are choosing shoes, strings, or a racket setup for smash practice and want a second opinion, contact us and we will help you narrow it down for your level and playing style.
10% off first order · Free shipping on $200+ · 14-day returns · Canadian badminton specialty shop
Leave a comment
This site is protected by hCaptcha and the hCaptcha Privacy Policy and Terms of Service apply.