
Last updated: July 2026 · Written by the team at Badminton House
Quick Answer: Badminton Prehab Exercises
Use loaded prehab to build capacity in the tissues badminton stresses most: adductors, shins, Achilles/calf, hamstrings, and forearms.
Default
Best starting point: 2 sessions per week, choosing 3–5 loaded exercises from this guide and progressing slowly so your legs and forearms adapt without stealing recovery from court sessions.
Knee/ankle
Prioritize tibialis raises and eccentric calf lowering if repeated lunges, jumps, and direction changes leave your lower legs feeling underprepared.
Groin/hips
Prioritize Copenhagen planks and single-leg RDLs if wide lunges, recovery steps, and fast changes of direction expose weakness through the inner thigh or posterior chain.
Your Training Week — Quick Start
Short on time? Here is where this prehab session sits in a badminton week. Tap any exercise to jump straight to its how-to, sets, reps, and load.
| Day | Focus | Do this |
|---|---|---|
| Mon | Lower body + core | Lower-body session + core & rotation |
| Tue | Court: drills + footwork | Shadow footwork + multi-shuttle drills |
| Wed | Upper body + prehab (this session) | Upper-body session, then prehab: Copenhagen plank 2–3×20–40s/side · Tibialis raise 2–3×15–20 · Eccentric calf lowering 3×8–10 · Single-leg RDL 2–3×8–10/leg · Wrist roller 2–3×2–4 |
| Thu | Power + fast hands | Power / plyometrics + reflex work |
| Fri | Light skills / recovery | Easy touch session or rest. Keep it light. |
| Sat | Match play | Warm up, then club matches or games. |
| Sun | Recovery / mobility | Rest, easy mobility, or an optional light session. |
A 3-gym-day template (Mon/Wed/Thu). Training twice a week? Keep Mon + Wed. See the full badminton gym program and weekly training plan for 2–4-day options.
Prehab for badminton means loaded strength, not stretching: building the adductors, shins, calves/Achilles, hamstrings, and forearms to handle lunges, jumps, and long rallies. Badminton injuries cluster in the knee and ankle, so this guide targets those loads directly: Copenhagen planks (groin), tibialis raises (shin), eccentric calf lowering (Achilles), single-leg RDLs (posterior chain), and wrist rollers (grip). This is prehab for healthy players: if you're already in pain, start with a clinician and see our common badminton injuries guide.
Prehab first, gear second. Check live footwear availability once your shoes stop matching your landing and cutting mechanics.
In This Guide
Copenhagen Plank


The Copenhagen plank is a side-plank variation that loads the hip adductors: the muscles that brake and stabilize wide lunges, side-to-side defence, and fast changes of direction. It builds large gains in eccentric adductor strength, and low adduction strength relative to abduction is a known groin-injury risk factor in cutting sports, though injury-reduction evidence for the exercise itself is mixed.
Set up in a side plank with your top leg supported on a bench, hips lifted in a straight line, then pull the lower leg up and lower under control. Support the top knee (not the ankle) until 12–15 controlled reps per side feel clean, over about 8 weeks, before adding external load.
Load & Progression: Copenhagen Plank
Start
2–3 sets of 20–40 seconds per side. Hold a clean side plank (top leg supported, hips stacked), starting with the short-lever (top-knee) version and only holding as long as the pelvis stays level.
Progress
Extend the hold toward 40 seconds, then lengthen the lever by supporting the top ankle instead of the knee. Earn the position before you ever add external load.
Why
Strong adductors contribute to braking and stabilization during the wide lunges and lateral pushes badminton constantly demands.
Tibialis Raise


The tibialis raise loads the tibialis anterior (the front-of-shin muscle that dorsiflexes the foot), which controls how the foot meets the floor during every split step, lunge recovery, and landing. This is loaded strength work, not balance training; for the symptom/return-to-play side, see our ankle sprain guide.
Stand back against a wall, feet slightly forward, knees straight. Pull toes toward shins with heels down, then lower slowly. Don't let them slap. Once controlled, load further with a tib bar; expect shin soreness 48–72 hours after adding or increasing load.
Load & Progression: Tibialis Raise
Start
2–3 sets of 15–20. Use the bodyweight wall version with heels down and toes pulled fully up, stopping a rep or two before the range shortens or the toes start to slap down.
Progress
Build toward 20 clean reps, then make it harder by stepping the feet a little farther from the wall. Keep the lowering slow rather than reaching for heavy load.
Why
Front-of-shin strength supports controlled foot movement during split steps and lunge recoveries.
Eccentric Calf Lowering


Eccentric calf lowering is the loaded Achilles/calf drill: standing on a step, let the heel drop below step level under control, then use the other leg to reset, building capacity in the lengthened position that badminton's lunges, jumps, and quick recoveries demand.
Do a straight-knee version (gastrocnemius, for jumps and pushes) and a bent-knee version (soleus, for lower defensive positions). The classic Alfredson protocol uses 3 sets of 15 for each with a 3-second lowering phase; the original 12-week, twice-daily volume is far more than most players need, and lower-volume dosing works too.
For general lower-body slow-tempo calf work, see our leg strength guide.
Load & Progression: Eccentric Calf Lowering
Start
3 sets of 8–10 slow, lowering-only reps per leg. Start with bodyweight off a step, taking about 3 seconds to lower the heel and using the other leg to return to the top.
Progress
Once the bodyweight version is controlled, add a little load with a light backpack and build gradually. Never rush the lowering phase or bounce at the bottom.
Why
Slow eccentric loading builds the Achilles and calf tolerance that badminton's constant jumping and push-off demand.
Single-Leg RDL


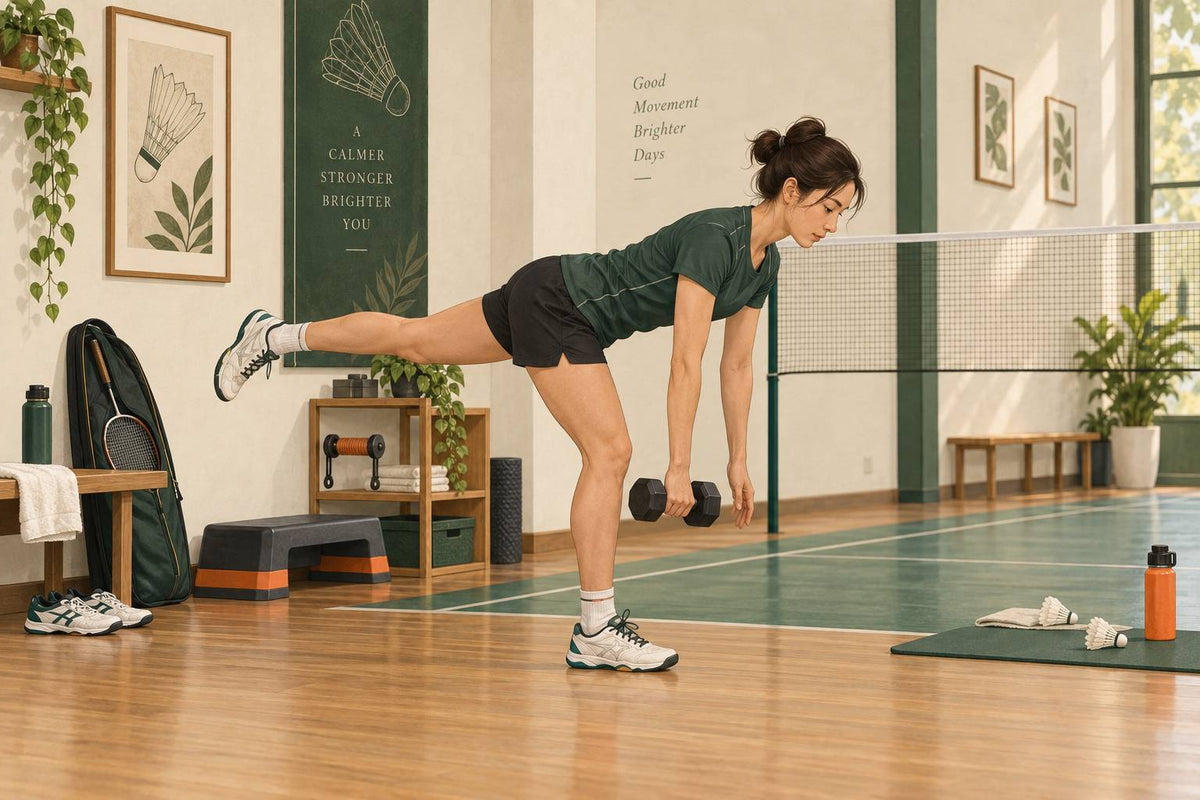
The single-leg RDL is the loaded posterior-chain exercise here: hamstrings, glutes, and core stability to control fast deceleration and one-leg landings. Unlike a two-leg hinge, it trains one hip to stay strong while the other leg reaches back, closer to how you actually brake and recover on court, and it generates more hamstring activity than a double-leg deadlift.
A 2025 cohort study in 77 high-school track-and-field athletes observed fewer mild-to-moderate hamstring strains after adding bodyweight single-leg RDLs to warm-ups; it did not establish a badminton injury-prevention effect. To perform it: stand on a slightly bent leg, hinge at the hips as the free leg reaches straight back in one neutral line, hold a weight opposite the standing leg if loading, and lower slowly until you feel the stretch before driving back up.
Keep the hips square and don't rush the eccentric. This is prehab for healthy players, not a rehab plan for a current strain.
Load & Progression: Single-Leg RDL
Start
2–3 sets of 8–10 per leg. Start bodyweight and own your balance first, only holding a light dumbbell once you can control the lowering phase without hopping or twisting.
Progress
Add reps, then a light dumbbell in the hand opposite the standing leg, keeping the pelvis square and spine long. Let balance and clean form, not weight, decide when to progress.
Why
Single-leg hip strength and balance support control during lunges and one-leg recoveries.
Wrist Roller


The wrist roller trains grip endurance under constant tension: winding a hanging weight up on a rope, then controlling it back down works the wrist flexors, extensors, brachioradialis, and pronators together, the forearm group that manages racket angle and grip pressure across long rallies. If you already have elbow or wrist pain, use our elbow/wrist pain guide instead.
Stand tall, arms extended at shoulder height, elbows mostly straight, and wind the weight using only the wrists. If your shoulders shrug or elbows pump, the load's too heavy. Program 2–4 sets, 45–60 seconds rest, 1–3 times a week, after strength work or court practice rather than before a session needing crisp racket control.
Load & Progression: Wrist Roller
Start
2–3 sets of 2–4 full up-and-down cycles. Use a light load you can wind with your arms extended at shoulder height, wrists doing the work and shoulders quiet.
Progress
Add a cycle, or a small amount of load, only when the current weight stays strict. If the shoulders shrug or the elbows pump, it is too heavy.
Why
Forearm and wrist endurance helps sustain controlled racket handling through long rallies.
FAQ
How often should I do loaded badminton prehab?
2–3 short sessions a week is a good start for healthy players. Progress load slowly and skip heavy prehab right before hard matches.
What if an exercise causes pain?
Stop the set, reduce load or range, and don't push through sharp or lingering pain. This supplements medical care; it doesn't replace assessment.
What gear complements prehab?
Badminton House doesn't sell gym equipment like wrist rollers or tib bars. Loaded strength is the main tool. Court shoes matter too; check live footwear availability when it's time to replace them.
Which Loaded Prehab Exercise Should You Choose?
If you only have time for two or three exercises, prioritize lower-leg and posterior-chain work first. Badminton injuries are heavily lower-limb dominant, led by the knee and ankle.
| Choose if... | Best exercise | Why | Otherwise |
|---|---|---|---|
| Ankle/shin is the weak link | Tibialis raise | Builds dorsiflexion strength for landing control. | For balance/RTP work, see ankle guide. |
| Achilles/calf is the limiter under jumps | Eccentric calf lowering | Builds Achilles capacity (a common badminton tendon site). | For general leg strength, see leg guide. |
| You struggle with single-leg control | Single-leg RDL | Unilateral hinge for hamstrings, glutes, and balance under load. | For max strength, treat this as an accessory, not the whole plan. |
| Groin/adductors are the weak link side to side | Copenhagen plank | Eccentric adductor strength; low adduction relative to abduction is a groin-strain risk factor. | Injury-reduction evidence is mixed. Strength gains aren't a guarantee. |
| Forearm fades late in games | Wrist roller | Trains forearm endurance under constant tension. | Already have elbow/wrist pain? See elbow/wrist guide. |
| Unsure where to start | Tibialis raise + calf lowering + single-leg RDL | Covers the most common badminton injury pattern: ankle, shin, and posterior chain. | Want the bigger picture first? See common injuries guide. |
Get new badminton guides by email
Join the Badminton House list for occasional emails with new guides, technique tips and news from our club in Moncton.
By subscribing, you agree to receive Badminton House emails and can unsubscribe anytime.
Prehab works best when it's boring, progressive, and consistent (a few loaded exercises repeated between club nights, not a max-effort gym day). Questions on matching your gear to how you train? Contact Badminton House.
Support your prehab with court gear built for badminton movement.
Shop Badminton FootwearCheck live availability · Canadian badminton specialty shop


Leave a comment
This site is protected by hCaptcha and the hCaptcha Privacy Policy and Terms of Service apply.